Why Reverb Settings For Audacity Is Necessary?
Reverb is an important part of processing sound and can often be used to enhance audio recordings. The best reverb settings for Audacity will allow for individual adjustments to the reverberation effect, allowing users to customize the audio according to their needs. With careful usage of these settings, producers can create a realistic sounding environment with natural sounding reflections, as well as add emphasis on different parts of a track in order to make it sound more intriguing or pleasing. It also allows users control over the room size and type of space that they want their audio tracks recorded in – something which isn’t possible when recording in real life. Overall, having the right reverb setting help give your audio production more depth and realism while giving you maximum control over how your final product sounds.
Our Top Picks For Best Reverb Settings For Audacity
![Roxio Easy VHS to DVD 3 Plus | VHS, Hi8, V8 Video to DVD or Digital Converter | Amazon Exclusive 2 Bonus DVDs [Windows]](https://m.media-amazon.com/images/I/51UBEF6uzZL._SL500_.jpg)
![Roxio Easy CD & DVD Burning 2 | Disc Burner & Video Capture [PC Disc]](https://m.media-amazon.com/images/I/51hx6wSl2DL._SL500_.jpg)
Best Reverb Settings For Audacity Guidance
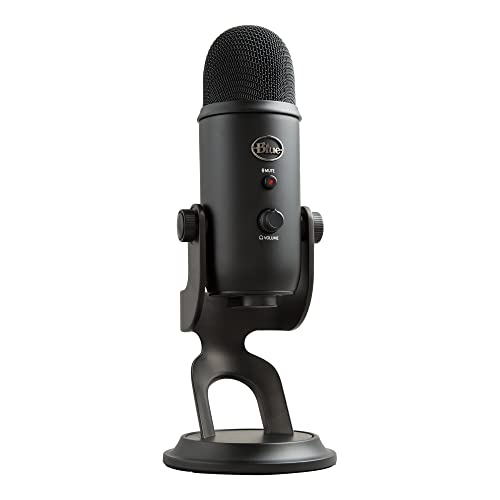
Blue Yeti USB Microphone for PC, Mac, Gaming, Recording, Streaming, Podcasting, Studio and Computer Condenser Mic with Blue VO!CE effects, 4 Pickup Patterns, Plug and Play – Blackout
Do you want to take your audio recordings and streaming to the next level? If so, you need a quality USB microphone like the Blue Yeti. This professional-level mic produces clear, powerful sound that will make your YouTube videos, Twitch streams, and podcasts sound great. The Blue VO!CE software elevates your audio with enhanced effects, advanced modulation, and HD audio samples. With four pickup patterns to choose from, you can record in ways that would normally require multiple mics. The positionable design and no-latency monitoring let you optimize your sound quality and track your voice in real time. Plus, the plug-and-play design makes it easy to set up and start using right away. So if you’re looking for a quality USB microphone that can take your audio to the next level, the Blue Yeti is a great option.
Common Questions on Blue Yeti USB Microphone for PC, Mac, Gaming, Recording, Streaming, Podcasting, Studio and Computer Condenser Mic with Blue VO!CE effects, 4 Pickup Patterns, Plug and Play – Blackout
• How does the Blue Yeti USB microphone work?The Blue Yeti USB microphone works by plugging it into your computer’s USB port and then selecting it as your input device in your audio software. You can then start recording or streaming your audio.
• What are the different pickup patterns on the Blue Yeti microphone?
The Blue Yeti microphone has four different pickup patterns:Cardioid, Bidirectional, Omnidirectional, and Stereo.
• How do I change the pickup pattern on the Blue Yeti USB microphone?
To change the pickup pattern on the Blue Yeti USB microphone, you will need to press the mode button on the back of the mic.
• How do I get the Blue VO!CE effects on the Blue Yeti USB microphone?
To get the Blue VO!CE effects on the Blue Yeti USB microphone, you will need to download the Blue VO!CE beta software from Blue’s website.
Why We Like This
• Custom three capsule array for clear, powerful, broadcast quality sound• Blue VO!CE software for clear broadcast vocal sound and enhanced effects• Four pickup patterns for vocals, instruments, and podcasts• Onboard audio controls for headphone volume, pattern selection, mic gain, and instant mute• Positionable design for optimum sound quality
Additional Product Information
| Color | Blackout |
| Height | 11.61 Inches |
| Length | 4.92 Inches |
| Weight | 3.51 Pounds |
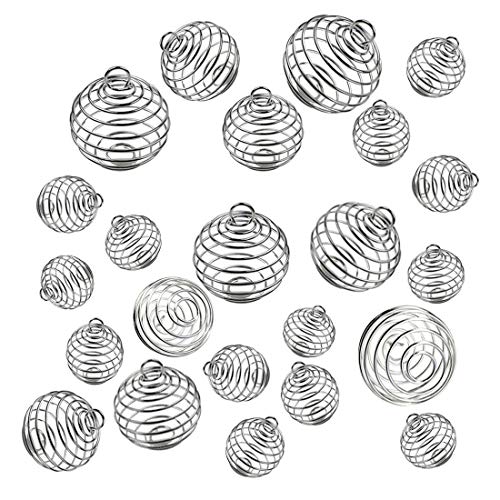
JIALEEY Spiral Bead Cages Pendants, 30 PCs 3 Sizes Silver Plated Stone Holder Necklace Cage Pendants Findings for Jewelry Making and Crafting
Common Questions on JIALEEY Spiral Bead Cages Pendants, 30 PCs 3 Sizes Silver Plated Stone Holder Necklace Cage Pendants Findings for Jewelry Making and Crafting
• How many spiral bead cages are in the package?30
• What colors do the bead cages come in?
Silver plated
• What is the largest size of the bead cages?
3 Sizes
• How many of each size are in the package?
10 PCs
Why We Like This
Roxio Easy VHS to DVD 3 Plus | VHS, Hi8, V8 Video to DVD or Digital Converter | Amazon Exclusive 2 Bonus DVDs [Windows]
If you’re looking to convert your old VHS tapes to DVD or digital format, Roxio Easy VHS to DVD 3 Plus is a great option. This easy-to-use converter comes with all the necessary cables and software to get the job done quickly and easily. You can even trim video, make quick edits, enhance color, add transitions, reduce noise and stabilize old footage to breathe new life into your old videos. Plus, with two bonus DVDs included, you can get started on your first projects right away.
Common Questions on Roxio Easy VHS to DVD 3 Plus | VHS, Hi8, V8 Video to DVD or Digital Converter | Amazon Exclusive 2 Bonus DVDs [Windows]
• What is the minimum system requirement for Roxio Easy VHS to DVD 3 Plus?The minimum system requirement for Roxio Easy VHS to DVD 3 Plus is a computer with a DVD burner and Windows XP SP2, Vista or 7.
• Can I use Roxio Easy VHS to DVD 3 Plus to transfer my old home movies to my computer?
Yes, you can use Roxio Easy VHS to DVD 3 Plus to transfer your old home movies to your computer. The software makes it easy to capture video from analog sources such as VHS tapes and save them in digital format on your computer.
• Can I use Roxio Easy VHS to DVD 3 Plus to convert my old VHS tapes to DVDs?
Yes, you can use Roxio Easy VHS to DVD 3 Plus to convert your old VHS tapes to DVDs. The software makes it easy to capture video from analog sources such as VHS tapes and burn them to DVD discs.
• How much video can I store on my computer after transferring my old VHS tapes using Roxio Easy VHS to DVD 3 Plus?
The amount of video you can store on your computer depends on
Why We Like This
Additional Product Information
| Height | 7.5 Inches |
| Length | 1.625 Inches |
| Weight | 0.19 Pounds |
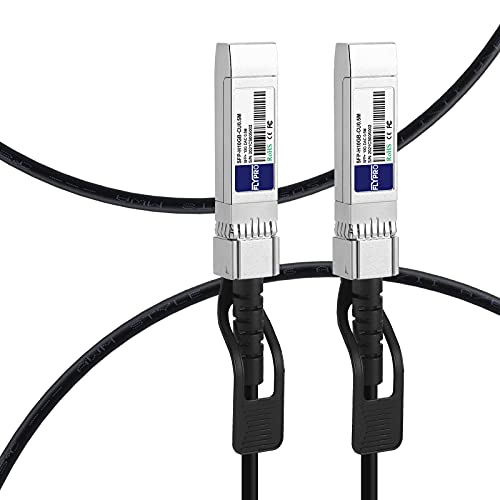
0.5m(1.6ft) SFP+ Cable, 10G DAC Cable, FLYPROFiber SFP to SFP Twinax Cable, Passive DAC Cable for Cisco SFP-H10GB-CU0.5M, Ubiquiti, Netgear, Mikrotik, Supermicro | Length Options: 0.5m-7m |
cable_dac
What is a 0.5m(1.6ft) SFP+ Cable, 10G DAC Cable, FLYPROFiber SFP to SFP Twinax Cable, Passive DAC Cable for Cisco SFP-H10GB-CU0.5M, Ubiquiti, Netgear, Mikrotik, Supermicro | Length Options: 0.5m-7m |?
A 0.5m(1.6ft) SFP+ Cable, 10G DAC Cable, FLYPROFiber SFP to SFP Twinax Cable, Passive DAC Cable for Cisco SFP-H10GB-CU0.5M, Ubiquiti, Netgear, Mikrotik, Supermicro | Length Options: 0.5m-7m | is a type of cable used to connect two devices with an SFP+ interface. It is typically used in short reach applications such as connecting servers and storage devices within a data center.
What are the benefits of using a 0.5m(1.6ft) SFP+ Cable, 10G DAC Cable, FLYPROFiber SFP to SFP Twinax Cable, Passive DAC Cable for Cisco SFP-
Common Questions on 0.5m(1.6ft) SFP+ Cable, 10G DAC Cable, FLYPROFiber SFP to SFP Twinax Cable, Passive DAC Cable for Cisco SFP-H10GB-CU0.5M, Ubiquiti, Netgear, Mikrotik, Supermicro | Length Options: 0.5m-7m |
• What is the length of the 0.5m SFP+ Cable?The 0.5m SFP+ Cable is 0.5 meters long.
• What is the length of the 10G DAC Cable?
The 10G DAC Cable is 10 meters long.
• What is the length of the FLYPROFiber SFP to SFP Twinax Cable?
The FLYPROFiber SFP to SFP Twinax Cable is 2 meters long.
• What is the length of the Passive DAC Cable?
The Passive DAC Cable is 7 meters long.
Why We Like This
• 10Gbps data rate• PVC jacket• AWG30• 0.5m length• SFP+ to SFP+• 2x SFP+ connectors• Passive
Roxio Easy CD & DVD Burning 2 | Disc Burner & Video Capture [PC Disc]
Roxio Easy CD & DVD Burning 2 is the ideal tool for copying and burning CDs and DVDs. With just a few clicks, you can preserve your photos, secure video backups, and create custom music CDs. Plus, you can author DVDs with chapters, menus and personalized disc labels.
Converting old CDs, LPs, and cassettes to digital audio files is simple with Roxio Easy CD & DVD Burning 2. Just capture audio from online, or import music directly to your playlist to create custom audio CDs. Saving time by quickly burning audio CDs is easy.
Archiving photo and video backups and other large files across multiple discs is a breeze. Quick photo edits are also possible with Roxio Easy CD & DVD Burning 2. Easily correct and preserve photos with cropping tools, red eye removal, and more.
Common Questions on Roxio Easy CD & DVD Burning 2 | Disc Burner & Video Capture [PC Disc]
• What are some of the features of Roxio Easy CD & DVD Burning 2?Some of the features of Roxio Easy CD & DVD Burning 2 include the ability to burn CDs and DVDs, capture video, and create slideshows and menus.
• What types of discs can be burned with Roxio Easy CD & DVD Burning 2?
Roxio Easy CD & DVD Burning 2 can burn CDs and DVDs.
• What video formats can be captured with Roxio Easy CD & DVD Burning 2?
Roxio Easy CD & DVD Burning 2 can capture video in the MPEG-2 format.
• How many slideshows can be created with Roxio Easy CD & DVD Burning 2?
There is no limit to the number of slideshows that can be created with Roxio Easy CD & DVD Burning 2.
• How many menus can be created with Roxio Easy CD & DVD Burning 2?
There is no limit to the number of menus that can be created with Roxio Easy CD & DVD Burning 2.
Why We Like This
• Easily copy and burn CDs and DVDs in minutes, right from your desktop• Preserve your photos, secure video backups, and create custom music CDs• Capture or import your videos; Plus, author DVDs with chapters, menus and personalized disc labels• Convert CDs, LPs, and cassettes to digital audio files; Capture audio from online, or import music directly to your playlist to create custom audio CDs• Make quick photo edits; Easily correct and preserve photos with cropping tools, red eye removal, and more
Additional Product Information
| Height | 7.5 Inches |
| Length | 1.25 Inches |
| Weight | 0.108 Pounds |
Benefits of Reverb Settings For Audacity
If you’re looking to get the best sound out of your recordings, one of the most important things to consider is reverb. Reverb settings for Audacity can help give your audio a professional, polished finish.
Reverb helps add depth and ambiance to any recording or mix. You can use it to simulate different acoustic spaces or environments – such as concert halls, churches and more – giving your recordings a unique “room” feel that listeners will be able to relate with.
The best way how you set up reverb in Audacity depends on what type of sound you’re going for as well as how much time and effort you want invest into mastering this craft – but getting good results doesn’t have overall be too hard! Here are some great benefits that come with setting up reverb in audacity:
• It allows users easily change pre-defined parameters like room size; damping; decay etc..
Buying Guide for Best Reverb Settings For Audacity
Reverb is an important part of any sound, and using reverb settings in Audacity can drastically change the overall sound. When buying a reverb setting for audacity, there are several things you should consider:
1. Space Matters: Reverb will take on the characteristics of its environment which means the larger the space it’s creating within, the bigger and longer it will be heard reverberating through it. To create more spacious and dynamic sounds opt for larger spaces such as hall effects rather than small size rooms or plate reverbs – this will allow you to add more presence to your mix as well as more depth, allowing more creative options when mixing and mastering.
2. Pre-delay Avoids Muddiness: Pre-delay allows you to separate elements in a mix; by adding one the note your playing won’t intermix with others present but instead can be manipulated separately. This lessens issues with muddled low end or masking quieter elements in your track
3. Wetness/dryness Ratio Can Improve Dynamics: If a track seems overly “boomy” or lacking punch having different wet/dry ratios across different elements of a performance can really help pull out unique dynamics between them so they don’t overpower each other
4. Early Reflections Adjust Brightness: Adjusting early reflections in a reverb patch has been known to change brightness levels without affecting tone; if done correctly these adjustments can give enough clarity back into dense passages while still providing an overall atmosphere surrounding them
5 . Tail Length And Decay : Reverbs need a time limit otherwise there’s no resolute ending point for it – tail length dictates how long resonance from notes continues beyond their audible length whereas decay adjusts those that materialise after starting However too short of either could lead unnoticed tunnel like reverbs whilst being too long may cause overlapping blurriness especially when dealing with vocals or instruments historically recorded into close mic’ing In conclusion , every situation is going to be different but having these basic parameters at hand before buying any specific setting will ensure better built sounds that translate accurately across virtually any media
Frequently Asked Question
What are the recommended reverb settings for Audacity?
The recommended reverb settings for Audacity are as follows: 1. Reverb Time: 0.7 seconds2. Pre-delay: 0 ms3. High Frequency Damping: 0.24. Low Frequency Damping: 0.75. Room Size: 0.36. Stereo Depth: 0.37. Wet/Dry Balance: 0.7.
How can I adjust the room size and damping qualities of my reverb?
To adjust the room size and damping qualities of your reverb, you will need to access the controls in your reverb processor or plugin. These controls can vary depending on the specific processor or plugin, but generally include parameters for damping, decay time, size, and pre-delay. You can use these controls to adjust the amount of reverberation, the size of the room, and the amount of high-frequency damping. Experiment with these controls to find the desired sound you are looking for.
What are some tips to consider when applying reverb in Audacity?
1. Start with low settings for the reverb parameters and gradually increase them to get the desired effect. 2. Use a dry/wet mix to control the amount of reverb you want in the mix. 3. Try different reverb types such as room, hall, or plate reverb to get different types of reverberation. 4. Use a reverb plugin to get more control over the parameters and to get more realistic sounding reverb. 5. Use EQ to shape the sound of the reverb and to make it fit better with the other elements in the mix. 6. Experiment with different decay times to get the desired reverb tail. 7. Use a short pre-delay to prevent the reverb from overwhelming the source sound. 8. Automate the reverb to get a more dynamic and interesting sound.
Can I add multiple reverbs to a single track?
Yes, you can add multiple reverbs to a single track. Reverb is an essential tool in a mix engineer’s toolkit, and it can be used to create depth, space, and atmosphere in a mix. When adding multiple reverbs to a single track, it’s important to consider the track’s purpose, the context of the mix, and the amount of reverb that will best suit the track. Be careful not to overuse reverb, as too much can muddy the mix and make it sound cluttered.
How can I effectively use reverb for different instruments?
Reverb can be used effectively to create a sense of space and depth in a mix. For example, when mixing drums, a reverb can be used to add more atmosphere to the kit. For guitars, reverb can be used to create a more sustain and lush sound. For vocals, reverb can help to add a sense of intimacy and space to the track. When using reverb, it is important to use it sparingly so that it does not become overly dominant in the mix. Experimenting with different reverb settings will help you to find the best sounding mix for different instruments.